TL;DR

Get business pricing on tools and workshop supplies
- Business-only prices and quantity discounts
- Tax-exempt purchasing
- Multiple users, one account, clear invoices
You can retrofit suspenders to many regular belts with removable clips, loops, or securely fastened tabs, provided the adapter fits your belt and suspender ends. Put the setup on while wearing your trousers, adjust the straps standing, then sit, bend, and walk to check for slipping, rubbing, or belt tension that fights the suspenders.
A belt can hold your tools while suspenders keep your trousers from sagging; the trick is giving the two jobs separate room to work. With the right adapters, you can add braces to many existing belt setups without buying trousers with suspender buttons or replacing a belt that still has years of work left in it.
This guide shows you how to check compatibility, choose removable or more permanent attachment points, place the straps, and adjust the fit through normal movement. You’ll also learn what to inspect before trusting a new setup on a long shift, from clip teeth and belt stitching to the waistband that carries the load.
There isn’t one adapter that fits every belt. A thick leather tool belt, a narrow dress belt, and a buckle with little spare room each create different constraints. Treat the first fitting as a careful adjustment, not a test of how much weight a homemade tab can carry.
Check belt width, thickness, buckle clearance, and suspender-end type before choosing an adapter.
Position front attachments toward the hips and space rear attachments so straps hang smoothly without rubbing or twisting.
Wear the belt comfortably and adjust the suspenders to support the trousers without creating a tug-of-war.
Inspect clips, loops, and tabs for slipping, sharp edges, worn teeth, loose stitching, and material damage.
Test the setup standing, sitting, bending, and walking; a belt adapter cannot correct a poorly fitting waistband.
How to Retrofit Suspenders to Any Belt
Add braces to many existing belt setups with compatible clips, loops, or securely fastened tabs. The belt can carry tools while suspenders support your trousers—if each attachment fits and the two systems have room to work.
An adapter creates a connection point. Comfort still comes from fit, placement, and a careful movement check.
Start with compatibility. Make one adjustment at a time, then test the setup in ordinary motion.
Belt, buckle, suspender ends, trousers
Clips, threaded loops, fixed tabs
Stand, sit, bend, walk
Stable support without fighting tension
Check four points of compatibility
Measure and inspect the actual belt and trousers. No single adapter fits every width, thickness, buckle, or suspender end.
Width & thickness
Confirm the adapter can pass over or grip the belt. Heavy stitching and thick leather may block a narrow loop or clip.
Buckle clearance
Check whether the buckle, belt loops, or nearby pouch straps leave room for attachments to sit flat and stay accessible.
Clip, hook, or button
Match the adapter to your suspender ends. Traditional button-end braces need buttons; clip ends need compatible attachment points.
Waistband & fabric
Check waistband fit, belt loops, fabric condition, and rise. An adapter cannot fix trousers that fit poorly or pull when seated.
Three ways to add attachment points
Choose based on how often you remove the braces, how the belt moves, and whether you want to modify your gear.
Clip-on adapters
Fast to remove for a belt-only setup. Look for firm grip, smooth edges, and teeth that do not damage the belt. If an adapter shifts under a gentle pull, it may move during work.
Check: grip & edge finishSmall belt loops
Loops thread onto the belt to create a connection point for compatible ends. Check that they fit the belt and stay positioned without bunching against belt loops or buckle hardware.
Check: fit & positionLeather or webbing tabs
Fixed tabs can provide repeatable placement, but material, stitching, and hardware carry the strain. Inspect construction closely and test gently before relying on them.
Check: stitching & fasteningSome accessories attach to trousers rather than the belt. Read the product details to confirm the mounting surface and exact compatibility. Punching a belt hole is not automatically necessary and can weaken the belt, especially near an edge or existing hole.
Adjust while wearing the full setup
Set strap length standing naturally, then check how the attachments behave through movement. Your body, trouser cut, and suspender style determine the best position.
Dress first
Put on your trousers and belt. Leave room near the buckle and belt loops.
Attach points
Set front attachments toward the hips; space rear points so straps hang smoothly.
Set strap length
Connect the suspenders and adjust while standing relaxed. Avoid digging at the shoulders.
Test four motions
Sit, bend, and walk. Watch for slipping, rubbing, twisting, pinching, or uneven pull.
Change one thing
Adjust placement or length in small steps, then repeat the movement check.
Look for a smooth hang
The aim is steady support through normal movement—not a rigid waistband or a setup that needs constant readjustment.
Toward the hips. Leave enough room for the buckle, belt loops, and any work gear attached nearby.
Space for smooth straps. Points too close together can make straps rub or cross; uneven spacing can twist webbing and tug the waistband.
Look for even pull. The waistband should not draw sharply inward, and the trousers should stay at your preferred height as you move.
Make one change at a time. If you move an attachment, repeat the same movements so you can tell whether the fit improved.
Let belt and suspenders do different jobs
A belt can carry tools and fit comfortably while suspenders carry some or most of the trousers’ vertical load.
Room for both systems
Keep the belt secure without cinching it tight to hold the trousers firmly. Adjust the braces to support the trousers without pulling hard on the shoulders.
Avoid the tug-of-war
When a tight belt pushes down as shortened suspenders pull up, you may feel pressure, uneven strain, or restricted movement. Loosen or readjust, then retest while standing and sitting.
Inspect the parts that carry the load
A careful first fitting is an adjustment—not a strength test for homemade tabs or uncertain hardware.
Clip grip: stays in place under a gentle pull.
Edges: smooth, with no sharp contact points.
Teeth & hardware: not worn, loose, or damaging the belt.
Loops & tabs: secure, with no loose stitching or fastening.
Belt: no cracking, fraying, or weakened holes.
Trousers: sound waistband, loops, and fabric.
Fit the connection. Then fit the movement.
Retrofit suspenders can work with many regular belts when the adapter matches the belt and suspender ends. Choose removable clips or loops, or carefully secured fixed tabs. Place the straps so they hang smoothly, keep belt tension comfortable, and test the complete setup through ordinary movement.
Check these four details before buying or making an adapter
To retrofit suspenders to any belt, first match the adapter to the belt’s width and thickness, the suspender end, and the space available around the buckle. That quick check helps you avoid an attachment that will not close, slides along the belt, or crowds hardware you need for work.
Start with the belt itself. Measure its width and look at its thickness, stitching, edge finish, and buckle. A broad belt with heavy stitching may not pass through a narrow loop adapter, while a large buckle can leave too little room for a front attachment. For example, if you wear a thick tool belt with pouches near the hips, adapters may have to sit where they do not collide with the pouch straps.
Next, identify your suspender ends. Clip ends need an adapter designed to accept clips; hooks and button ends require their own compatible attachment points. Traditional button-end braces attach to buttons sewn to the waistband, while clip-end suspenders can connect to compatible belt adapters. These are different systems, so check the maker’s specifications instead of assuming that a similar-looking fitting will work.
Finally, check the trousers. A belt adapter does not change a loose waistband, weak belt loops, or a trouser rise that feels wrong when you sit. The belt, loops, and fabric still shape how the trousers sit on your body. A setup that looks tidy standing at a mirror can tug unevenly once you load the pockets and climb a ladder.
- Belt: width, thickness, stitching, buckle clearance.
- Suspender ends: clips, hooks, or button ends.
- Trousers: waistband fit, belt loops, fabric condition.
Specifications and availability change, so check current manufacturer details for the exact adapter rather than relying on a broad claim that it fits every belt.
Products Worth Considering

DEWALT DWE315K Corded Oscillating Multi-Tool Kit
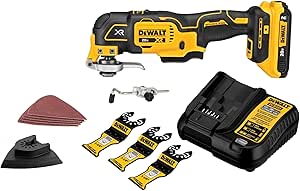
DEWALT 20V MAX XR Brushless Oscillating Multi-Tool Kit with Battery and Charger (DCS356D1)

Makita TM3010CX1 Oscillating Multi-Tool Kit
As an affiliate, we earn on qualifying purchases.
Choose a removable adapter or a more permanent attachment
Removable clip adapters and belt loops let you add attachment points without altering your belt, while sewn tabs or other permanent modifications can give you a fixed location. Which option suits you depends on how often you want to remove the suspenders, how much the belt moves, and whether you’re prepared to sew or modify the gear.
Clip-on belt adapters are quick to remove and convenient if you switch between suspenders and a belt-only setup. Check that the clip has a firm grip, smooth edges, and teeth that do not damage the belt. If it can slide when you pull the strap gently, it may shift during a full day of bending and carrying. Small loops thread onto a belt and provide a place for compatible suspender ends to attach. They need to stay in the intended position without bunching against the buckle or belt loops.
Tabs made from leather or webbing can create a more fixed attachment, but their stitching and fastening carry the strain. A home-made tab should use suitable material and secure construction, with no loose thread, sharp edges, or weak hardware. Test it gently before relying on it. A belt hole is not automatically necessary: punching one can weaken a belt, especially near an edge or existing hole.
Also distinguish belt adapters from trouser attachments. Some accessories clip directly to the trousers rather than creating an attachment point on the belt. Read the product description closely. If you want to keep your belt as the mounting surface, make sure the design actually attaches to it.
For example, a worker who removes suspenders to drive between jobs may prefer removable adapters; someone who wears the same work belt and suspenders daily may value fixed, consistently placed tabs. Neither choice removes the need to inspect contact points and fastening regularly.
Fit the attachments so straps hang smoothly and stay put
Place the front attachments toward your hips and space the rear attachments so the straps hang without rubbing together or twisting. The right positions depend on your body, trouser cut, and suspender style, so set them while wearing the trousers instead of copying a placement that worked for someone else.
Put on your trousers and belt first, then attach the adapters. Connect the suspenders and stand naturally. The straps should run smoothly over your shoulders, and the rear points should not pull the waistband sharply inward. If the straps cross or rub at the back, adjust their spacing. Uneven placement can twist the webbing and tug one side of the waistband harder than the other.
Use this fitting sequence:
- Put on the trousers and belt, then place the adapters where the buckle and belt loops leave room.
- Connect the suspenders and set the strap length while standing relaxed.
- Check that the trousers sit at the height you want and the straps do not dig into your shoulders.
- Sit, bend, and walk. Look for slipping, twisting, pinching, or a waistband that pulls unevenly.
- Make small changes to placement or strap length, then repeat the movement check.
Imagine a pair of straps that looks even at a workbench but rubs together every time you turn to reach a tool. A small spacing adjustment may fix the rub, but moving an attachment too far can pull the trousers in a new direction. Make one change at a time so you can tell what actually improved the fit.
The target is not a perfectly rigid waistband. It is a smooth hang that keeps the trousers at your preferred height through ordinary movement without sharp pulling or constant readjustment.
Let the belt and suspenders share the work comfortably
Wear the belt comfortably and let the suspenders carry some or most of the trousers’ vertical load. If you cinch the belt tight enough to hold the trousers firmly while also shortening the suspenders to pull upward, the two systems can compete and create pressure around your waist and shoulders.
A belt still has a job, especially when it holds pouches or other gear. It should stay secure without digging into your waist. Suspenders are designed to support the trousers from the shoulders, so they need enough tension to do that without pulling the waistband uncomfortably high. You may find that easing the belt slightly makes a bigger difference than tightening the shoulder straps further.
For instance, consider someone carrying a tape measure and fasteners in a pouch on one hip. If that side of the belt keeps dipping, they might first check that the adapter is not slipping and that the straps are balanced. Cranking the belt tighter may only press the buckle into the stomach. A level adjustment to the straps and a check of the trouser fit can spread the support more comfortably.
Do not judge the setup only while standing still. Sit in a truck, reach overhead, and bend toward the floor. If the belt edge bites when you sit or the straps pull hard when you reach, revisit the balance and attachment positions. Comfort over several movements matters more than a crisp look in front of the mirror.
Fit check: the belt should stay comfortable around your waist while the suspenders keep the trousers at the height you want. If either system feels like it is fighting the other, adjust the load and fit before a full day’s work.
Inspect clips, loops, and tabs before they damage your gear
Inspect every contact point for slipping, sharp edges, worn teeth, loose stitching, and damage to the belt or fabric. Adapter hardware takes repeated movement, and a small rough edge can chew through soft material long before a strap actually breaks.
Run a finger carefully along the adapter’s edges and check whether a clip closes firmly. Do not tug hard enough to risk injury or damage; a gentle pull can reveal an obvious loose connection. Check whether a loop slides toward the buckle when you move, or a tab twists under light tension. If something shifts in a short fitting, it may shift more during a shift spent reaching, lifting, or climbing.
Clips can mark leather or snag delicate trousers, especially if their teeth are sharp or you attach them in the same spot every day. Before regular use, inspect the belt and fabric around the contact area. If you see scuffing, pulled threads, or a small tear, stop using that attachment point and reassess the hardware and materials. Repeated attachment in one place can wear a surface even when the clip feels secure.
Homemade loops and tabs call for special care. Material that feels stout in your hand may still have weak stitching or a fastener that pulls out under repeated motion. Check seams and hardware often, and test a new attachment gently before depending on it. A belt modification can be difficult to reverse, so do not punch a hole or cut a belt simply because one adapter does not fit.
For example, if a clip leaves a bright scrape on a dark leather belt after a short fitting, that visible mark is useful evidence. Try a different contact surface or a design suited to the belt material instead of waiting for the edge to wear through.
Use this quick troubleshooting guide when the fit feels wrong
If your trousers still sag or the straps feel uncomfortable, check the adapter grip, strap length, attachment spacing, and waistband fit in that order. Each symptom points to a different part of the setup, so changing everything at once can hide the cause and leave you with the same problem.
| What you notice | What to check | Practical adjustment |
|---|---|---|
| Trousers sag on one side | Uneven strap tension or a slipping adapter | Check the attachment grip and balance the straps. |
| Straps twist or rub | Rear attachment spacing and strap routing | Move the points slightly so the straps hang smoothly. |
| Belt or buckle digs in | Belt tension and suspender pull | Ease the belt and reset strap length while standing. |
| Clips mark material | Sharp teeth, rough edges, or an unsuitable contact surface | Stop and use hardware suited to the belt and trousers. |
Say you bend to pick up a case of fasteners and the waistband drops afterward. That may indicate the adapter slid, the suspender strap has too much slack, or the trousers themselves fit loosely at the waist. Check each point instead of assuming the suspenders need to be tightened as far as they will go.
Remember that an adapter supplies a connection point; it does not make every pair of trousers suitable for suspenders. If the waistband, belt loops, fabric, or trouser rise does not suit your shape and movement, another strap adjustment may not solve the underlying discomfort. In that case, try a better-fitting pair or a different attachment method.
Know when a belt retrofit is a good fit for your work
A retrofit makes sense when your belt and trousers are in good condition, the hardware matches your suspender ends, and you can place attachments securely without compromising the belt. It is a practical way to keep familiar gear in use, but it does not guarantee the same stability as buttons sewn into a suitable waistband.
For a worker who already owns clip-end suspenders and a belt with enough clear space, removable adapters can provide a straightforward starting point. Someone wearing button-end braces may need compatible buttons or a different suspender style, because a belt loop alone does not automatically connect to every end. The exact design matters more than the general label “suspender adapter.”
Think about the day’s movement and load. A setup used for light errands may not get the same repeated strain as one worn through long hours of bending, walking, and carrying pouches. If the belt is already cracked, its stitching is separating, or the trousers’ loops are damaged, attaching more hardware is unlikely to improve reliability. Replace or repair worn gear before adding another load path.
There is no single major recent breakthrough in retrofit suspenders; practical options have gradually expanded to include removable adapters, adjustable hardware, and designs for standard clip-end suspenders. Online tutorials and small accessory makers also make do-it-yourself approaches easier to find, but instructions vary. Confirm the material, dimensions, and attachment method before treating a tutorial or product listing as a fit guarantee.
If the setup will support your trousers all day, test it through the movements you actually make and inspect it as part of regular gear care. The most useful rig is the one that keeps its connection points secure and stays comfortable as the day gets longer.
Frequently Asked Questions
Can I add suspenders to a regular belt?
Usually, if you choose an adapter that fits the belt’s width and thickness and accepts your suspender ends. Check buckle clearance too; a large buckle can leave little room for a front attachment.
Can I wear suspenders and a belt together?
Yes. Keep the belt comfortable and let the suspenders support the trousers. If both are tightened to hold the waistband firmly, they can pull against each other and cause pressure.
Will belt adapters work with any suspenders?
No. Some accept clip ends, while other systems use hooks or button ends. Check the adapter’s specifications and match them to the hardware on your suspenders.
Where should the attachments sit?
Front attachments generally sit toward the hips, and rear attachments need enough spacing for the straps to hang smoothly without rubbing together. Fine-tune the positions while wearing your trousers, since body shape and trouser cut affect the fit.
Do I need to sew or punch holes in my belt?
Many removable adapters need no sewing. Sewn tabs or button attachments may require it, while punching a belt hole can weaken the belt and is not universally needed.
Can clips damage my belt or trousers?
They can, particularly when teeth are sharp, materials are delicate, or you keep attaching them in one worn spot. Inspect the contact area for scuffs, pulled threads, and rough edges before regular use.
What should I do if the trousers still sag?
Check adapter grip, strap length, attachment spacing, and waistband fit. If the adapter slides or the waistband is loose, tightening the straps alone may not fix the problem.
Conclusion
Start with compatibility: measure the belt, identify the suspender ends, and choose an attachment method that suits both. Put the setup on, adjust it in small steps, then sit, bend, and walk before relying on it for work. A secure retrofit should keep the trousers at a steady height without making the belt dig or the straps bite.
Keep the gear that still works, but inspect the points where it meets. A smooth strap, a level waistband, and hardware that stays put are small details you can feel with every step.